通过V2Ray获取自由
前几天由于开会,我的梯子又双叒叕废了,受不了了,不用SS了。毕竟烂大街容易被ban,于是就试了下号称很厉害的V2,配置起来还是有点复杂的,而且需求比较多,萌新劝退。
References:
- https://www.v2ray.com/ 貌似官网被墙了,这TM就很尴尬了
- https://toutyrater.github.io/ 非常好的简明教程,貌似也被墙了...
- https://www.xpath.org/blog/001531048571577582cfa0ea2804e5f9cb224de052a4975000
- https://www.mortif.top/%E8%B6%85%E7%AE%80%E5%8D%95%E4%B8%8A%E6%89%8B%E6%90%AD%E5%BB%BAV2ray-ws-tls-nginx%E6%95%99%E7%A8%8B/
- https://oing9179.github.io/blog/2017/03/v2ray-as-WebSocket-Proxy-behind-Nginx/
\>\>\>\>update 20200202
貌似最近墙又升级了,就目前情况来看,有效的上网方式有两种,一种是V2ray的Websocket+TLS方式,注意直接用VMESS协议已经不行了。另一种是使用trojan,一个Websocket+TLS的简化版,由于trojan没有VMESS加密,所以速度和资源消耗都比Websocket+TLS方式稍低,但也没差多少,不过V2ray的客户端支持要比trojan好很多。Websocket+TLS方式相比trojan的优势在可以套CDN,选择哪个看自己的需求。
<<<<
折腾的过程还是挺复杂的,关键是配置比较麻烦,而且通用性不强,可能适合我的不一定适合你。下面说下我的需求和配置。
因为我懒,所以可能只给出过程,具体的操作需要你自行去搜索解决。
那,首先来了解下原理吧。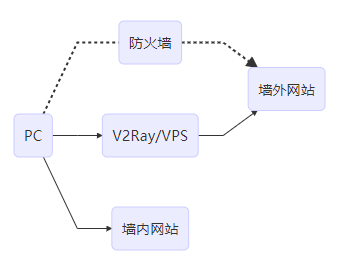
emmmmm,官网的好简单,意思就是和SS是同一类型的软件,也就是代理。
算了,重新找个能说清楚的吧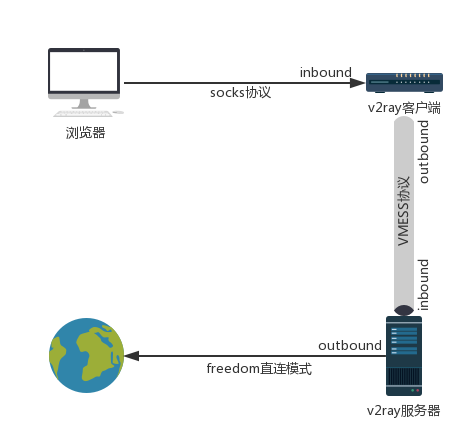
这个就好多了,可以看到和SS还是差不多的,有客户端和服务端,客户端和浏览器用的依然是socks协议,客户端和服务器用的是VMESS协议,服务器和外网依然是直连。改变的重点就是VMESS。
其他的介绍什么的就不说了,这里介绍下环境场景和本文采用的方式。
由于手里有这个破站,暂时还不想扔掉。同时还想兼顾自由的需求,所以结合v2的文档,最终确定为WebSocket+TLS+Web。
阅读本文之前应该先看完教程,本文只是提供了一个已经确定可以使用的demo而已。
开始!
再次注意,需求比较多,萌新劝退:
环境及需求:
- CentOS 7
- Nginx
- 域名
- SSL证书
首先VMESS依赖于系统时间,请确保使用V2Ray的系统UTC时间误差在90秒之内,时区无关。在Linux系统中可以安装ntp服务来自动同步系统时间。
可以参考:https://www.racecoder.com/index.php/archives/533/ 安装ntp服务。
然后是Nginx,可以参考:https://www.racecoder.com/index.php/archives/538/ 安装Nginx服务器
Nginx安装SSL证书,参考:https://help.aliyun.com/knowledge_detail/95491.html?spm=5176.2020520154.cas.31.f79a56a7D0boyo
证书放置目录如下:
[root@centos-s-1vcpu-1gb-01 ~]# cd /etc/nginx/
[root@centos-s-1vcpu-1gb-01 nginx]# ll
total 68
drwxr-xr-x 2 root root   72 Mar  7 19:58 cert
drwxr-xr-x 2 root root    6 Mar  6  2018 conf.d
drwxr-xr-x 2 root root    6 Mar  6  2018 default.d
-rw-r--r-- 1 root root 1077 Mar  6  2018 fastcgi.conf
-rw-r--r-- 1 root root 1077 Mar  6  2018 fastcgi.conf.default
-rw-r--r-- 1 root root 1007 Mar  6  2018 fastcgi_params
-rw-r--r-- 1 root root 1007 Mar  6  2018 fastcgi_params.default
-rw-r--r-- 1 root root 2837 Mar  6  2018 koi-utf
-rw-r--r-- 1 root root 2223 Mar  6  2018 koi-win
-rw-r--r-- 1 root root 3957 Mar  6  2018 mime.types
-rw-r--r-- 1 root root 3957 Mar  6  2018 mime.types.default
-rw-r--r-- 1 root root 4201 Mar  8 16:02 nginx.conf
-rw-r--r-- 1 root root 3441 Mar  8 10:39 nginx.conf.bak
-rw-r--r-- 1 root root 2656 Mar  6  2018 nginx.conf.default
-rw-r--r-- 1 root root  636 Mar  6  2018 scgi_params
-rw-r--r-- 1 root root  636 Mar  6  2018 scgi_params.default
-rw-r--r-- 1 root root  664 Mar  6  2018 uwsgi_params
-rw-r--r-- 1 root root  664 Mar  6  2018 uwsgi_params.default
-rw-r--r-- 1 root root 3610 Mar  6  2018 win-utf
[root@centos-s-1vcpu-1gb-01 nginx]# cd cert/
[root@centos-s-1vcpu-1gb-01 cert]# ll
total 8
-rw-r--r-- 1 root root 1675 Mar  7 19:58 1247353_racecoder.com.key
-rw-r--r-- 1 root root 3675 Mar  7 19:58 1247353_racecoder.com.pem
[root@centos-s-1vcpu-1gb-sfo2-01 cert]#
配置文件参考阿里云的配置就可以了。
v2安装使用官方提供的脚本,如果系统不支持yum,请自行安装unzip和daemon。执行后出现如下提示。
[root@vultr ~]# bash <(curl -L -s https://install.direct/go.sh)
Installing V2Ray v4.18.0 on x86_64
Downloading V2Ray: https://github.com/v2ray/v2ray-core/releases/download/v4.18.0/v2ray-linux-64.zip
  % Total    % Received % Xferd  Average Speed   Time    Time     Time  Current
                                 Dload  Upload   Total   Spent    Left  Speed
100   608    0   608    0     0    907      0 --:--:-- --:--:-- --:--:--   907
100 10.5M  100 10.5M    0     0  2965k      0  0:00:03  0:00:03 --:--:-- 4804k
Extracting V2Ray package to /tmp/v2ray.
Archive:  /tmp/v2ray/v2ray.zip
  inflating: /tmp/v2ray/config.json
   creating: /tmp/v2ray/doc/
  inflating: /tmp/v2ray/doc/readme.md
  inflating: /tmp/v2ray/geoip.dat
  inflating: /tmp/v2ray/geosite.dat
   creating: /tmp/v2ray/systemd/
  inflating: /tmp/v2ray/systemd/v2ray.service
   creating: /tmp/v2ray/systemv/
  inflating: /tmp/v2ray/systemv/v2ray
  inflating: /tmp/v2ray/v2ctl
 extracting: /tmp/v2ray/v2ctl.sig
  inflating: /tmp/v2ray/v2ray
 extracting: /tmp/v2ray/v2ray.sig
  inflating: /tmp/v2ray/vpoint_socks_vmess.json
  inflating: /tmp/v2ray/vpoint_vmess_freedom.json
PORT:15227
UUID:c7f934fc-dfba-4eed-b4b2-13a9a9b0d80a
Created symlink from /etc/systemd/system/multi-user.target.wants/v2ray.service to /etc/systemd/system/v2ray.service.
V2Ray v4.18.0 is installed.
这样服务端就已经安装好了,而且可以使用Systemd进行控制,配置什么的先放放,等会说。由于v2官方只提供命令行,所以需要找第三方客户端,这样可以稍微舒服点用着,这里选择是据说好点的v2rayN,由于没有ss那种成熟的客户端,用起来只能说是凑合。以win10系统64为例:
下载地址:https://github.com/2dust/v2rayN/releases
可以看到有两个文件,我只下了v2rayN.zip,另一个我猜是v2的内核文件,和官网同步的应该是,但是保险起见,我们直接用官网下的内核,所以这里我们只下那个界面的壳子。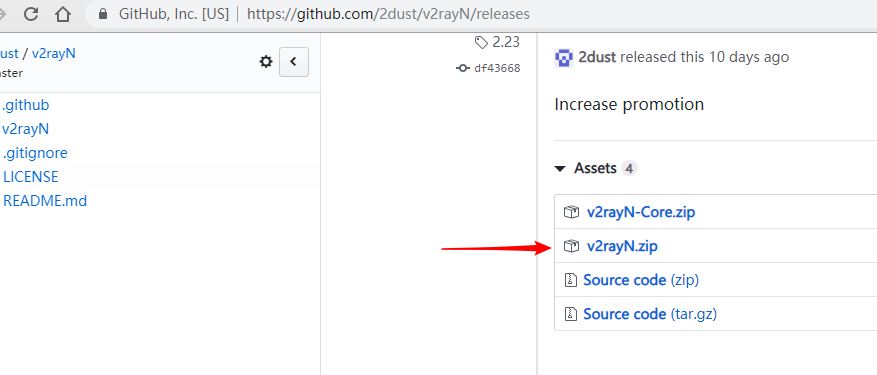
Core用官网的:
然后把官网的内核直接丢到v2rayN文件夹下: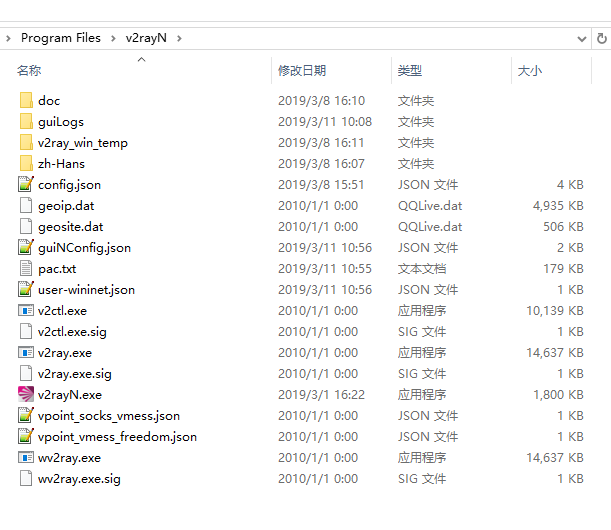
再次说明,内核是可以直接运行的,但是只有命令行窗口和无窗口直接运行模式,所以如果你不想这么硬核还是用客户端比较舒服,毕竟可以配置PAC。
下面就是配置文件了,这里给出我的配置并解释下配置的含义就结束吧。
首先是v2的配置
[root@centos-s-1vcpu-1gb-01 nginx]# cat /etc/v2ray/config.json
{
  "log": {
    "loglevel": "warning",
    "access": "/var/log/v2ray/access.log",
    "error": "/var/log/v2ray/error.log"
  },
  "inbounds": [{
    "port": 10086,
    "listen": "127.0.0.1",
    "protocol": "vmess",
    "settings": {
      "clients": [
        {
          "id": "xxxxxxxx-xxxx-xxxx-xxxx-xxxxxxxxxxxx",
          "level": 1,
          "alterId": 64
        }
      ]
    },
    "streamSettings": {
      "network": "ws",
      "wsSettings": {
        "path": "/v2"
      }
    }
  }],
  "outbounds": [{
    "protocol": "freedom",
    "settings": {}
  },{
    "protocol": "blackhole",
    "settings": {},
    "tag": "blocked"
  }]
}
开始部分是日志,然后inbounds表示入站流量配置,outbounds表示出站流量配置,可以看到出站流量就是直连,没什么好说的。入站的配置和SS很相似,port表示监听的端口,这个端口可以不开放给外网,因为反正要通过Nginx转发流量。clients的id就是生成的唯一id,类似于密码吧。然后就是网络,设置为websocket,path设置为"/v2"。这里需要注意,路径是随便设的,但是要和nginx的转发对应上,等会看nginx的配置就知道了。
下面看nginx的配置:
[root@centos-s-1vcpu-1gb-01 nginx]# cat nginx.conf
# For more information on configuration, see:
#   * Official English Documentation: http://nginx.org/en/docs/
#   * Official Russian Documentation: http://nginx.org/ru/docs/

user nginx;
worker_processes auto;
error_log /var/log/nginx/error.log;
pid /run/nginx.pid;

# Load dynamic modules. See /usr/share/nginx/README.dynamic.
include /usr/share/nginx/modules/*.conf;

events {
    worker_connections 1024;
}

http {
    log_format  main  '$remote_addr - $remote_user [$time_local] "$request" '
                      '$status $body_bytes_sent "$http_referer" '
                      '"$http_user_agent" "$http_x_forwarded_for"';

    access_log  /var/log/nginx/access.log  main;

    sendfile            on;
    tcp_nopush          on;
    tcp_nodelay         on;
    keepalive_timeout   65;
    types_hash_max_size 2048;

    include             /etc/nginx/mime.types;
    default_type        application/octet-stream;

    # Load modular configuration files from the /etc/nginx/conf.d directory.
    # See http://nginx.org/en/docs/ngx_core_module.html#include
    # for more information.
    include /etc/nginx/conf.d/*.conf;

    server {
        listen       80;
        server_name  racecoder.com;
        return       301 https://www.racecoder.com$request_uri;
    }

    server {
        listen       80 default_server;
        listen       [::]:80 default_server;
        server_name  www.racecoder.com;
        #server_name_in_redirect off;
        return       301 https://www.racecoder.com$request_uri;
    }

    server {
        listen       443;
        server_name  racecoder.com;
        return       301 https://www.racecoder.com$request_uri;
    }

    # Settings for a TLS enabled server.
    server {
        listen       443 ssl http2 default_server;
        listen       [::]:443 ssl http2 default_server;
        server_name  www.racecoder.com;
        ssl          on;
        root         /usr/share/nginx/html;

        ssl_certificate "/etc/nginx/cert/2666469_racecoder.com.pem";
        ssl_certificate_key "/etc/nginx/cert/2666469_racecoder.com.key";
        ssl_session_cache shared:SSL:1m;
        ssl_session_timeout  10m;
        ssl_ciphers ECDHE-RSA-AES128-GCM-SHA256:ECDHE:ECDH:AES:HIGH:!NULL:!aNULL:!MD5:!ADH:!RC4;
        ssl_protocols TLSv1 TLSv1.1 TLSv1.2;
        ssl_prefer_server_ciphers on;
        add_header Strict-Transport-Security "max-age=31536000; includeSubDomains; preload" always;
        add_header X-Frame-Options "DENY";

        # Load configuration files for the default server block.
        include /etc/nginx/default.d/*.conf;

        access_log logs/racecoder.log combined;

        # redirect to v2ray
        location = /v2 { # 与 V2Ray 配置中的 path 保持一致
            proxy_redirect off;
            proxy_pass http://127.0.0.1:10086;
            proxy_http_version 1.1;
            proxy_set_header Upgrade $http_upgrade;
            proxy_set_header Connection "upgrade";
            proxy_set_header Host $http_host;

            # Show realip in v2ray access.log
            proxy_set_header X-Real-IP $remote_addr;
            proxy_set_header X-Forwarded-For $proxy_add_x_forwarded_for;

            # disable v2ray log
            access_log off;
        }

        location / {
            index index.php index.html index.htm;
            try_files $uri $uri/ /index.php index.php;


            if (!-e $request_filename) {
                rewrite ^(.*)$ /index.php$1 last;
            }
        }

        location ~ .*\.php(\/.*)*$ {
            include fastcgi.conf;
            fastcgi_pass  127.0.0.1:9000;
        }

        error_page 404 /404.html;
            location = /40x.html {
        }

        error_page 500 502 503 504 /50x.html;
            location = /50x.html {
        }
    }

}
主要就是SSL的那部分server配置,上面的三个server都是301重定向,就是访问"racecoder.com","www.racecoder.com","https://racecoder.com"都会直接转到"https://www.racecoder.com",保证了域名的唯一可控,且强制https,即HSTS。最后一个server是主要的配置,里面既有博客的配置,也有SSL的配置,还有v2的配置。一点点看,首先是端口域名这些,pass。然后是SSL证书配置,pass。然后是location为"/v2"的配置,这里就表示访问"https://www.racecoder.com/v2"这个路径的流量会被转发到v2服务上,配置的端口需要改成你自己配置的,因此客户端也会需要配置这个路径,这个等会说。当然,直接访问这个路径是不可以的,它会返回一个400 Bad Request的错误。后面的location都是这个博客的配置,看看就好,如果有人用typecho也可以参考下啊,哈哈。到这服务端的配置就算完了。
下面是客户端的配置:
{
  "inbounds": [{
    // Port to listen on. You may need root access if the value is less than 1024.
    "port": 1080,

    // IP address to listen on. Change to "0.0.0.0" to listen on all network interfaces.
    "listen": "127.0.0.1",

    // Tag of the inbound proxy. May be used for routing.
    "tag": "socks-inbound",

    // Protocol name of inbound proxy.
    "protocol": "socks",

    // Settings of the protocol. Varies based on protocol.
    "settings": {
      "auth": "noauth",
      "udp": false,
      "ip": "127.0.0.1"
    },

    // Enable sniffing on TCP connection.
    "sniffing": {
      "enabled": true,
      // Target domain will be overriden to the one carried by the connection, if the connection is HTTP or HTTPS.
      "destOverride": ["http", "tls"]
    }
  }],
  // List of outbound proxy configurations.
  "outbounds": [{
    // Protocol name of the outbound proxy.
    "protocol": "vmess",

    // Settings of the protocol. Varies based on protocol.
    "settings": {
        "vnext": [
        {
            "address": "www.racecoder.com",
            "port": 443,
            "users": [
            {
                "id": "xxxxxxxx-xxxx-xxxx-xxxx-xxxxxxxxxxxx",
                "alterId": 64
            }
            ]
        }
        ]
    },
    "streamSettings": {
        "network": "ws",
        "security": "tls",
        "wsSettings": {
            "path": "/v2"
        }
    },
    // Tag of the outbound. May be used for routing.
    "tag": "vmess"
  },{
    "protocol": "blackhole",
    "settings": {},
    "tag": "blocked"
  }],

  // Transport is for global transport settings. If you have multiple transports with same settings
  // (say mKCP), you may put it here, instead of in each individual inbound/outbounds.
  //"transport": {},

  // Routing controls how traffic from inbounds are sent to outbounds.
  "routing": {
    "domainStrategy": "IPOnDemand",
    "rules":[
      {
        // Blocks access to private IPs. Remove this if you want to access your router.
        "type": "field",
        "ip": ["geoip:private"],
        "outboundTag": "blocked"
      },
      {
        // Blocks major ads.
        "type": "field",
        "domain": ["geosite:category-ads"],
        "outboundTag": "blocked"
      }
    ]
  },

  // Dns settings for domain resolution.


  // Policy controls some internal behavior of how V2Ray handles connections.
  // It may be on connection level by user levels in 'levels', or global settings in 'system.'
  "policy": {
    // Connection policys by user levels
    "levels": {
      "0": {
        "uplinkOnly": 0,
        "downlinkOnly": 0
      }
    },
    "system": {
      "statsInboundUplink": false,
      "statsInboundDownlink": false
    }
  },

  "other": {}
}
为了简短我已经删除了一些注释,但依然很多,其实客户端只是修改了inbounds和outbounds即入站和出站设置而已。客户端的inbounds和outbounds区别于服务端的inbounds和outbounds。对于客户端来说,浏览器的流量是inbounds,发送给v2服务器的流量是outbounds。但是对于服务器来说,客户端的流量是inbounds,访问真正的外网流量才是outbounds。主体不同。
inbounds设置和ss差不多,依然是socks协议,端口随便写,开启tls,即走https。
outbounds就是设置服务器的信息了,协议用vmess,地址填域名,端口443,也就是https的端口,id就是服务器生成的那个相当于密码的唯一id,websocket设置路径为"/v2",要和之前服务端配置的一致。其他都是一些默认的就可以,有需要可以自行研究下。
然后用v2的客户端导入这个配置就行了,比如v2rayN就是"添加自定义配置服务器"。然后就可以启用http代理,开启PAC模式,愉快的学习了。
贴一下手绘原理图,更易理解,灵魂画手,见谅。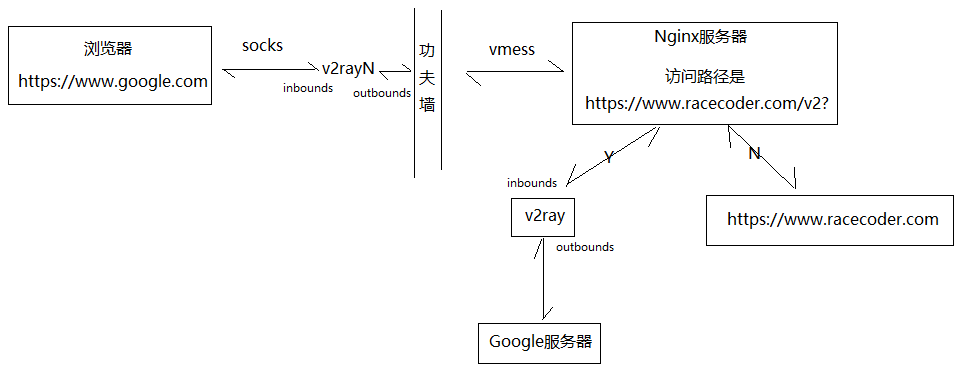
所以在墙的眼里我们只是访问了这个域名而已。有些能折腾的人还用上了cdn,这样即使一个CDN的IP被ban了,换个IP就行,我觉得暂时还没必要搞那么复杂,墙应该还没那么厉害,当然你愿意搞就去搞吧。
\>\>\>\>update 20190917
手机上也是有相应的客户端的,由于我这个穷逼只有安卓手机,就使用过的两款支持vmess协议的来说,v2rayNG比BifrostV更省电。当然,一切都可能是暂时的,还得看作者们更新的情况。
<<<<
\>\>\>\>update 20200408
由于v2rayNG不支持GFWlist,只支持分应用代理,而且根据作者目前的观点似乎是不打算加这个功能:https://github.com/2dust/v2rayNG/issues/38#issue-471522042。但是对于我这种使用Google账号的就不太友好了,chrome上有很多东西需要同步的,双浏览器不现实,开代理只能针对应用设置,chrome全部走代理就不太方便了,国内网站非常慢,所以还是换回了BifrostV。
<<<<
最后:
学习强国啊,骚年。不学习,你连这篇文章都看不懂,是不是~~!
 这破站
这破站